Pages

Monday 31 October 2016

A breath of woodland air


It's time for the October Clarity Challenge. And I'm loading it on the last day again! I could try to pretend that I'll do it earlier next month, but it's unlikely. Things tend to get left until they're the most urgent thing at the moment!

The theme is "Circles or Squares."

This idea developed in three stages. I wanted to do something dimensional, so decided on a square canvas, with square frames layered up and extending out from the sides. I even bought a set of square nesting dies to make it, which have proven very useful already.

When I received the gorgeous Clarity Club stencil this month, a set of beautifully delicate trees, I had the idea for a woodland theme, using that and other tree stamps and stencils. 

Finally, at my shamanic bodywork session I drew the forest card, which said "breathe", and gave me my focus.

I started with an 8x8 canvas board. I applied grunge paste through the new stencil, forming a tree up one side and leaves across the centre.


I added more branches across the top, with the same stencil, then individual leaves in the bottom left, using the maple leaves stencil. The only picture at this stage was all blurry!

Once the paste was dry, I spritzed with scattered straw distress ink. Then, replacing the stencils, I added colour with distress inks and stencil brushes.


It was a bit challenging to work out which leaves, and which way round, I'd used at the bottom. This is an Autumnal woodland, so lots of warm colours. I used aged mahogany, spiced marmalade, brushed corduroy and crushed olive.


Before I finished, I decided that the background was too yellow, so painted it with a cream acrylic paint - fiddly, but glad I did it. I also edged the canvas with potting soil archival ink.


For the squares to layer up, I made a series of frames, cutting Centura Pearl card with all the nesting dies together. I wanted the sturdiness of the card, but not the shine, so used the reverse.

I painted the frames with acrylic paint. I used hey pesto and claret, with touches of other colours applied through punchinella - so there are a few circles snuck in as well!


Then to make the patterns and images to be framed.

The main one uses the birch trees stencil, which I love. I started with antique linen ink, brushed over the whole card, then added the stencil and brushed over with mowed lawn, crushed olive, and a touch of pine needles. I darkened the trees with brushed corduroy.


Looking good, but again I changed my mind and decided it was too bright, so added walnut stain over the green later on.

For one of the other panels, I used a tree stamp. I started with brushed corduroy over the card, then inked up the stamp with distress markers in different colours, and stamped three times.


The back tree is second generation.

Very pretty, but too pale, so I added more trees behind, so it's more of a wood, and used the other tree in the set and third generation stamping to fill in the background. I used the side of the tall tree to add bushes at the front. I also went back over the background trees to darken then, which involved masking the front trees - they're not the easiest shape to cut out!

Mounted behind a frame, here's the finished panel.


Next a tiny panel, using the birth trees stencil again, but darker colours - walnut stain trees with aged mahogany between.


Being so small, the branches were a little unclear, so I added detail with the fine nib of a distress marker.

Another small panel, this time using one of the maple leaves. 


This has a crushed olive background, with detail from punchinella, and the leaf is brushed corduroy.

For the other panels, I used acetate rather than card, so the squares behind would show through.

For the word, I used my word chain stamps. I used letters from Brilliant, beauty, truth and love to make the word breathe. Stazon black ink so it is nice and crisp on the acetate.


One of my Clarity Club stamps, the ivy leaves, came out next. I stamped onto acetate using olive stazon, and also with versa mark then embossed in green.

I coloured in from the back with glass paints.


I was going to add white glass paint behind, which is opaque, but my pot is so old it's gone off. So I used white gesso, it took 3 layers.

I also pressed versa mark through the trees stencil and heat embossed in bronze. It was a lovely image, but didn't fit with the rest very well, so I didn't use it, although you can see it on some of the layouts below.

With all the panels mounted in frames, time to arrange on the canvas. I had a plan up front, but when I tried it, I didn't like it. It felt too cluttered, no room to breathe at all! 

So I had a play around.


This was a second attempt, still too busy.

My options were constrained as there was an area of texture paste at the top I wasn't happy with and needed to disguise or hide.


In the end I went with a simple option, not using all the panels I'd made (but keeping my favourites!) which feels much more open and spacious.


To mount, I raided my daughter's craft stash for black fun foam. I cut this to size with the dies to raise up the frames, without obscuring the acetate. Where squares overlapped, I used extra layers to build up and support the non overlapping parts.

I have put a hanging ring on the back, but don't have anywhere on the wall to hang for good photos. So I had to improvise a stand, to avoid bending the bottom square, while I propped it up in the kitchen, where the light is best, to take these shots.


My warm, autumnal, woodland reminder to create space and breathe.

Friday 28 October 2016

Sparkle snowflakes


Having missed last week's 52 Christmas Card Throwdown challenge, as I was away for a few days, I'm back this week for the technique challenge. They've given us embossing to work with.


Lots of ways to play with this one!

I started with a frame. I blended distress ink onto a sheet of Clarity stencil card. The colours used are tumbled glass, peacock feathers and salty ocean.


I then cut out my frame with my new square stitched dies.


I've got the outside aperture and inside square left over for use elsewhere.

To emboss the frame, I used the Clarity snowflake stencils. I covered them in gold pigment ink (it's more visible than versamark, so you can tell when the stencil is covered), and positioned them onto the frame.


I ran this through the grand calibur, which gives the first emboss (or deboss really)...


...then added platinum embossing powder and heated, for the second emboss. I repeated until the whole frame had been covered with snowflakes.


I also tried a darker blue card, with gold powder.


I like both, so will make another card, but have used the lighter one for the moment.

Time to make something to go in the middle! I tried stamping and embossing various baubles, and die-cutting some too.


But I wasn't that taken with any of them. The frame is quite strong, so needs something that won't be overwhelmed, and none had that wow factor. More bits to go into the stash pile for another card.

After a bit of mulling, I was writing up another blog post on some favours I made recently (see below this post) and realised that one of the techniques I'd used for that might be just the thing.

I started with some co-ordinating blue holographic paper from my stash, and stuck an adhesive sheet to the back of it.


I then turned over and peeled off the other backing sheet, and started adding to the sticky surface. Firstly I used gilding flakes, picking out the gold and blue colours from my mixed pot. Next I added blue glitter, then pale gold mica, and a bit of blue, although I didn't like that as much. Finally, I covered the sheet in platinum embossing powder to fill in the gaps.

I heated the sheet to "develop" the powder, and this was the result.


A lovely textured, shiny, glittery sheet to work with. I'm not sure if this counts as embossing, although it does use embossing powder.

I then die cut it with snowflake dies. You need a good die to go through the plastic adhesive sheet - my tattered lace dies did okay, but a cheaper one I had struggled a bit, and isn't such a clean cut.


Very pretty, you don't really get the sparkle and shine in the photo.

The last piece of the puzzle is a dry embossed background. I tried a few different folders, but chose one of my staples, a dotty pattern from tattered lace. I cut the card to size and edged it with the gold pigment ink before embossing.

This went onto the 6x6 card base first, then the frame. I used thick foam tape all round the frame; it had curled a little through being embossed, so the tape holds it nice and flat.

I used three of the snowflakes, mounted in the centre of the aperture using clear foam pads between the layers for lots of dimension. And finally a pearl in the middle - it really stands out in the photos, it's not quite so dominant in real life!


The end result is quite a delicate card.

Unfortunately, the 3 D snowflake doesn't photograph very well, but the mixture of colours and textures really catches the light.


Another blue card, I seem to be in a blue mood this month! I think this would look lovely in purple and silver as well, or in richer colours, maybe burgundy with copper. When I get some free time to play!

Thursday 27 October 2016

Harvest Festival Favours


Today I'd like to share with you the wedding favours I recently made for friends. And I'm going to submit them for the October Berkhamsted Creative Challenge, as they fit the theme of Harvest festival - Time of Plenty, with their Autumnal colours and edible filling.


Let's start with the samples I made for Becci and James to choose from.


The box in front is based on the meadow from my walled garden piece. They all use the dragonfly stamps, from Sheena Douglass.

The design they chose is a mixture of the two jars shown behind.

There are different parts that came together to make these favours. Let's look at the lids first. (The jars are the 110ml hexagonal glass jars from Hobbycraft.)


I painted the gold lids with white gesso, then decoupaged them with a decopatch paper.

The dragonflies are the larger stamp in the set. I stamped with versa mark onto heat proof acetate, heat embossed in gold and cut out with scissors.

For the flowers, I used a sheet of double sided adhesive. I attached it first onto the wrong side of gold paper (so the reverse is gold).

I then peeled off the other backing, and started adding to the sticky surface. First came gilding flakes, dotted across. Then glitter in bronze, gold and brown shades, including some tinselly pieces. I dusted gold shades of mica into some areas, then finished with gold and platinum embossing powder in the gaps, which I heated to set.

This is the first sheet I made:


And here's the second version, with more gilding flake and less mica. (It's also bigger.)


I love the texture this creates! It's fun too, basically you throw everything you have at the sheet.

I then die cut flower shapes from the sheets and layered up to form 3D flowers. I attached these to the lids, and the dragonflies to the flowers, using a glue gun.


On the jars themselves, I heat embossed the couples initials, R and J (Becci was Rebecca for this). I didn't know if heat embossing onto glass would work, but had a go, and it did. It just takes a long time to turn, as the glass absorbs more heat than card, and then takes a while to cool again.


The next step was the mini envelopes. These were cut from parchment using a punch, then embossed using the Groovi system. I added the fold lines, the names of the guests (the favours became place settings as well) and a twirly flourish.


To colour them, I sprayed them with gold paint from behind.

Inside, they each had a personalised printed message, which I edged with a brown sharpie pen to finish them off.

I pierced the corner of each envelope, and made a ring from wire to feed through to attach them.


I threaded the envelopes onto organza ribbon, along with a selection of beads, and feathers (I wired these with a spiral round the "stalk" and a loop, to be able to thread them on).

The ribbon was wrapped around the jar, with the knot hidden inside a bead. I used a dab from the glue gun to hold them in place.

I filled the jars with colourful dried fruits and seeds, arranged in layers.


When you see them all together, they make quite the swarm!


In situ they look rather more the part. What a beautiful table!

And many congratulations to Becci and James.


Friday 14 October 2016

Snowing gently


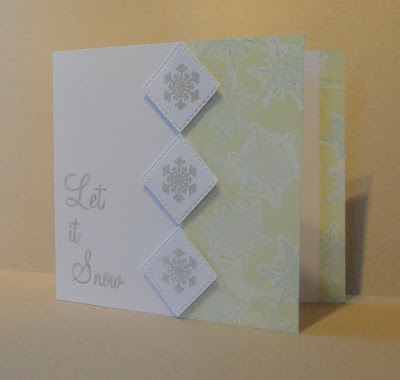
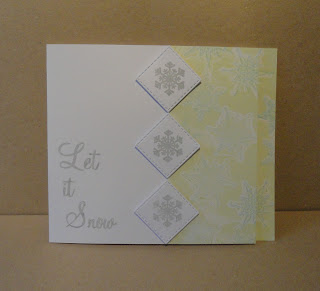
Christmas card with green and blue snowflake pattern on right and Let it Snow sentiment

The second week of the month means a colour challenge at the 52 Christmas Card Challenge.

This time, it's grey, soft blue, soft green.


52CCT Colour challenge grey, soft blue, soft green

For this one I took my starting point from a card Sam Crowe showed at the Clarity Open Day in June. The front was cut narrower than the back, and the pattern from the front carried onto a strip of the back/inside. She also used the shape stamps, which are firmly on my wishlist. I had a first run at this style with a birthday card I made this week, which I'll blog at some point.

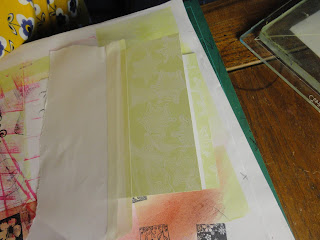
I started with a 6x6 card base, and trimmed back the front. I then masked off the left of the front.


Card base with front narrower than back, left masked off

Out came the gelli plate. I wanted to use a technique derived from something Barbara Gray demo'd on the telly last week, using the petite gel plates. I only have the very big one, but I can adapt!

Firstly, I spread green distress ink on half of the gel plate with the brayer. I used mainly bundled sage, with a touch of crushed olive to soften it a bit. I then stamped the Clarity snowflake stamps into the plate, to lift the ink off. Turns out, it's pretty difficult to see where you've been, especially if your plate is a bit mucky. Next time I'll stamp onto paper first, and put that under the gel plate to give me a guide.

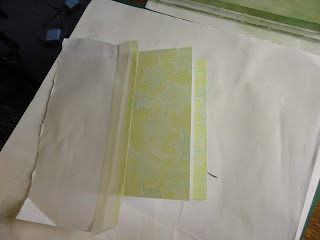
I then pressed the inky plate onto the exposed card, transferring the ink, with voids where I'd stamped.


Card with green snowflake pattern on right, left masked off

It's not perfect, but that's okay, it's a slightly grungy look I'm going for. Life is definitely much more straight forward with techniques that give you a bit of wiggle room, life's too short to be exact all the time.

Next I cleaned the gel plate and spread the blue on - tumbled glass, with a touch of salty ocean. I pressed the stamps into the plate again, but this time used the ink I picked up to stamp into the voids on the card, matching up each snowflake. Again, it doesn't need to line up perfectly.


Card with green and blue snowflake pattern on right, left masked off

I have to say, I am really pleased with the way this looks.


Card with green and blue snowflake pattern on right.

And without the mask. Snowflakes work well for this, but you could use flowers or leaves, so many other stamps, even words, and of course, any colours you fancy.

Edit: Actually not words! As the print from the gelli plate is reversed, you need to use stamps that are more or less symmetrical. 

At this point I forgot to take more progress photos!

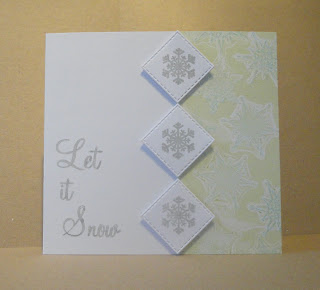
I cut 3 squares of white card, using my new Crealies double stitch square die set (bought for another project this month, but pressed into service for this card too). Using sky grey versa color ink, I stamped a smaller Clarity snowflake into the centre of each. I was going to heat emboss with clear powder  but the ink had a nice pearl finish so I left it without. I mounted the squares as diamonds along the border of the coloured area, on foam pads. I trimmed the bottom of the card so they fitted exactly. I like the contrast between the messy, grungy pattern and the crispness of the border.

Finally, I used the same grey ink to stamp the "Let it Snow" sentiment to the left of the card.


Christmas card with green and blue snowflake pattern on right and Let it Snow sentiment


This shows the pattern well, although you can't see the strip that carries onto the back section of the card.


Christmas card with green and blue snowflake pattern on right and Let it Snow sentiment


The pattern reminds me of wallpaper somehow.


Soft colours used to create a soft, gentle looking card. I don't usually use grey (I had to buy the grey ink especially for this card) but I'm won over by the gentle effect. I guess watering can archival ink is next on my shopping list.